Main

Tag Archives | toronto

Origami Chair

This past autumn I was commissioned to build a chair by a student in the Chair Design class I was co-teaching with Jeff Miller at the Center for Furniture Craftsmanship. During the brainstorming / model making / getting creative energy flowing exercise the student (Jed) came up with a captivating model by “simply” folding paper together into the form of a chair.

I wish I had decent pictures of the model, but let me tell you, Jeff and I were both immediately drawn to this concept and the potential it had. After a day or two of head scratching our collective brain power was getting pretty mushy, Jed’s chair was redesigned capturing some of the elegant lines the model had into a design Jeff, Jed and I were confident in Jed being able to build in just over a weeks time. By the end of the class Jed had created a striking, sit able chair, but he longed to see that original folded together model come to life. Jed commissioned me to make the original design, the endeavour took on a new life.

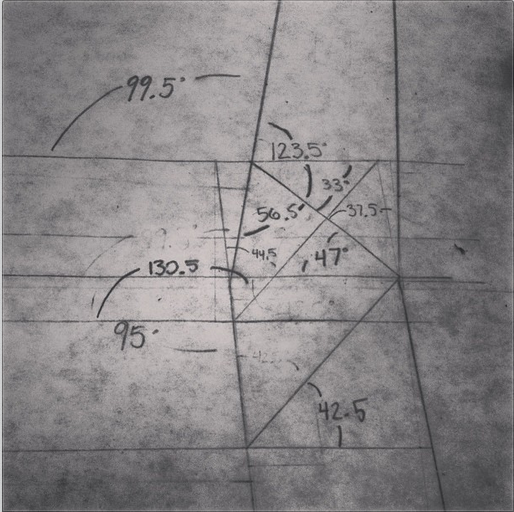
I knew I had gotten myself into a pretty hefty challenge, but let me tell you, I greatly underestimated what lay ahead. Fold some veneer here, fold some veneer there, voila, chair. I knew it was going to be labour intensive, but what I did not anticipate was the mathematician level of trigonometry / master origami problem that lay before me.

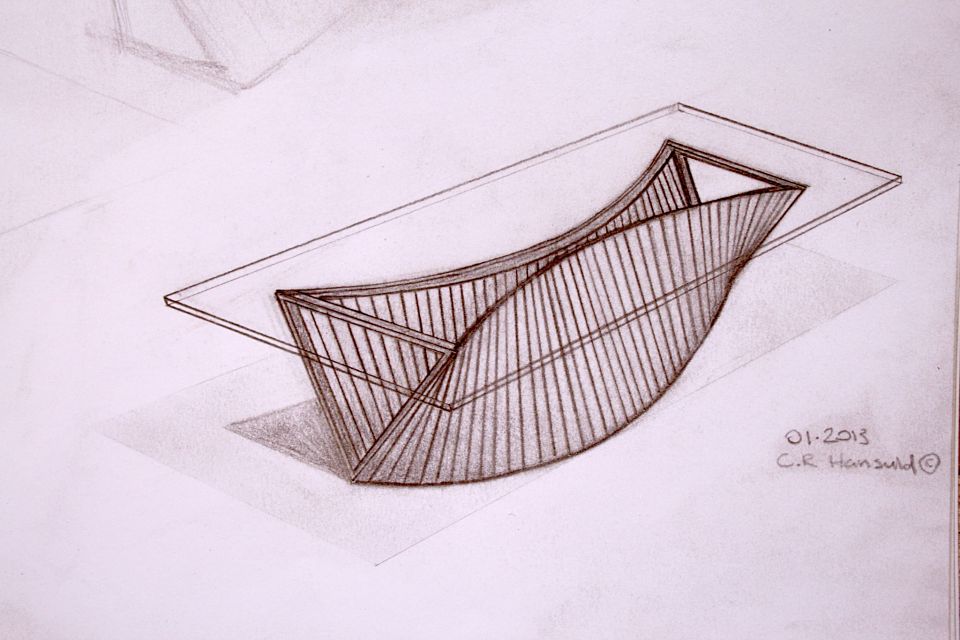
I started in my sketchbook (like always) and came up with a few reiterations of the chair I was content with and started trying to decipher just how to build one of them. After more head scratching I realized I was chasing the wrong concept altogether, and that in reality I wasn’t pleased with any of the three concepts I was initially working on. I was trying to merge Jed’s original model, his finished redesigned chair and something I thought would be comfortable into a pretty little package. I had ended up in a place with a chair that lacked a cohesive look and feel, I reached out to Jed wanting to discuss the project with him. Jed had no interest in seeing and adding input on the designs, he wanted me to find the right design for myself, to look past the hangups and let my voice be heard. It was a deflating and empowering moment all at once. I took a long walk, enjoyed some fresh air, and realized I needed to go back to the start. I got out the paper, and for what seemed like days folded together both model sized and full sized chairs. From here my current concept was born. I ended up straying a bit from the original model Jed had folded together back in September, but have found a direction I believe will lead to a very unified, refined looking piece.

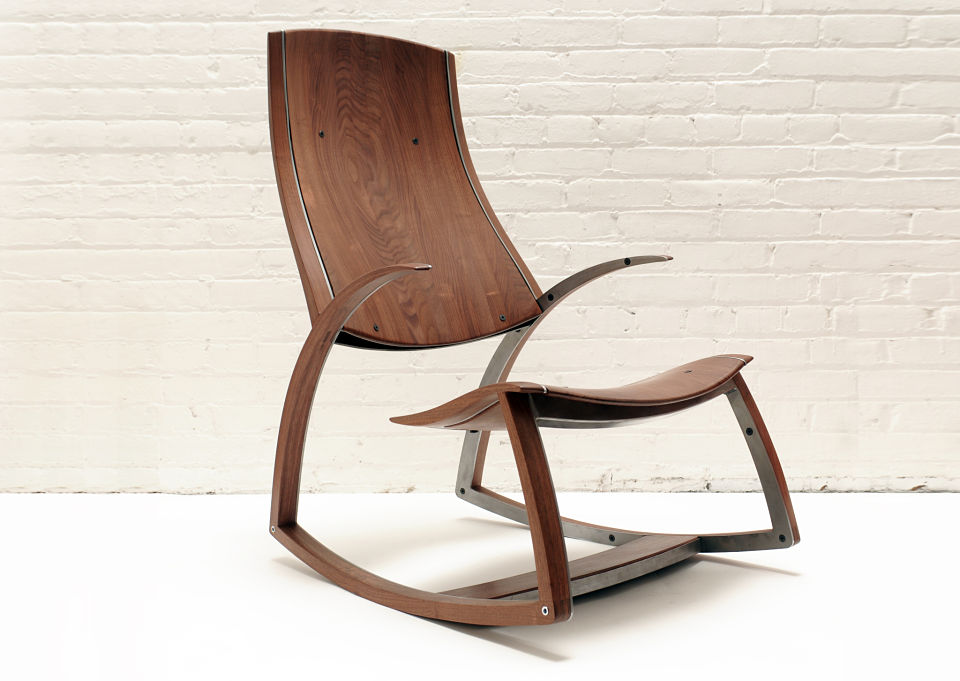
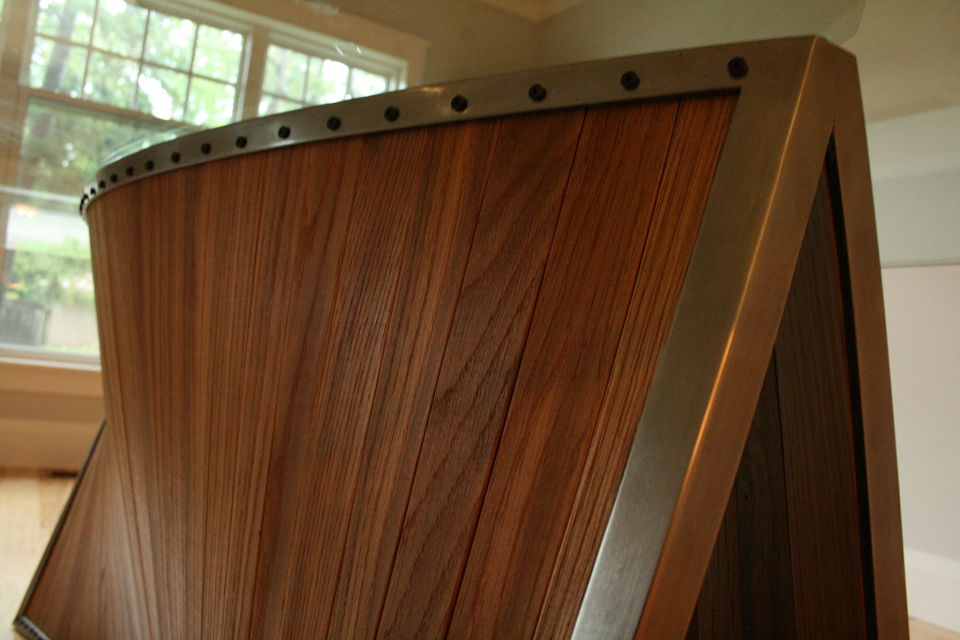
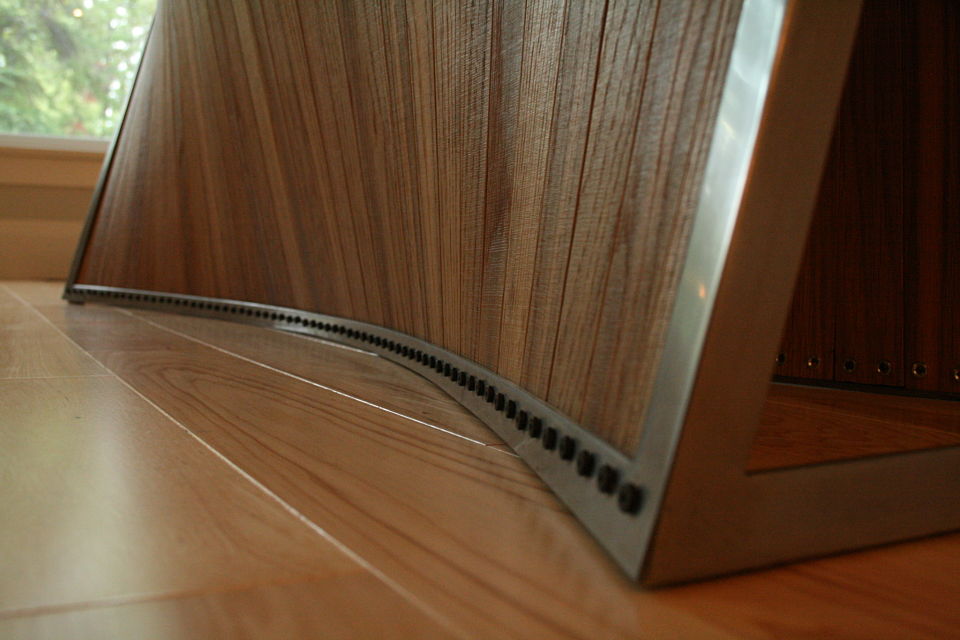
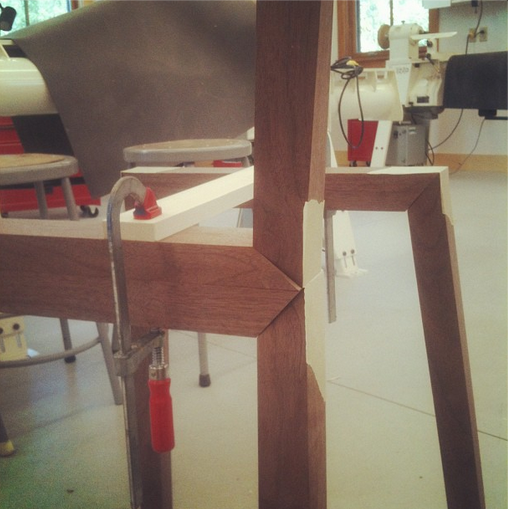
The plan is to make the chair out of just two parts, seems easy enough right? The first part will be a bent panel that makes up the back rest, arm rests, and back legs of the chair. The second part will be a bent panel that makes up the front legs, seat, and another set of back legs. The two panels will then be joined (glued and bolted) up the back leg. Both panels will be pressed out of commercial veneer with alternating grain direction to essential be shop made plywood, this way it will be strong and stable. There will be relief cuts in the veneer to allow for the panels to split apart (top of the back rest and front of the seat) where the panels change the plane they are being bent on.

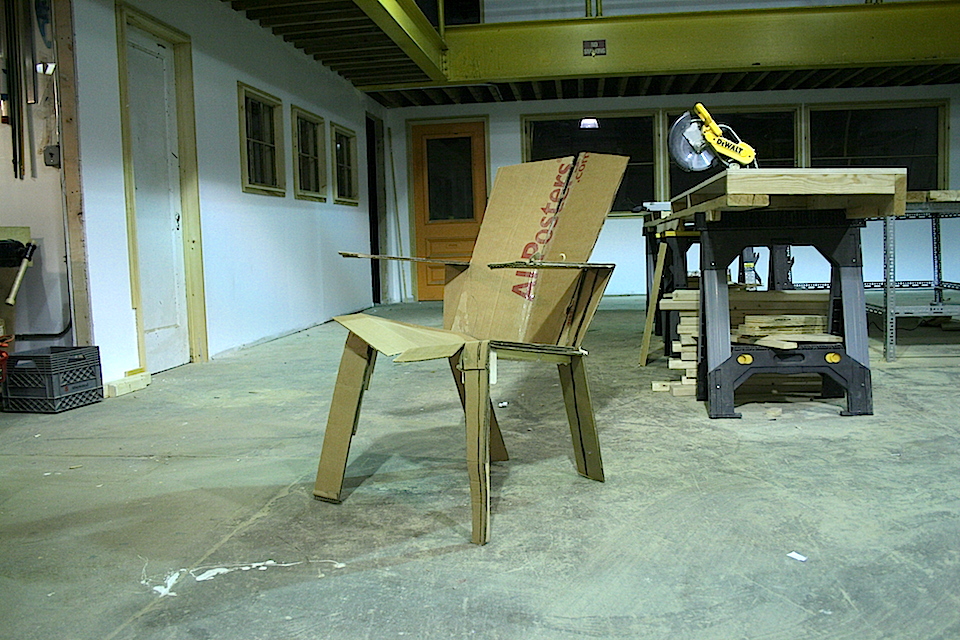
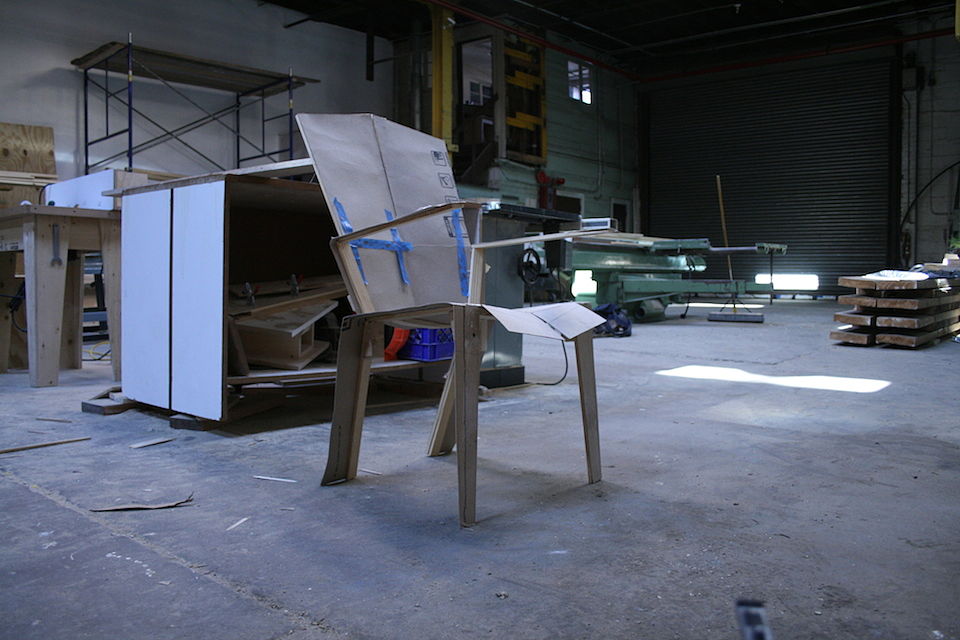
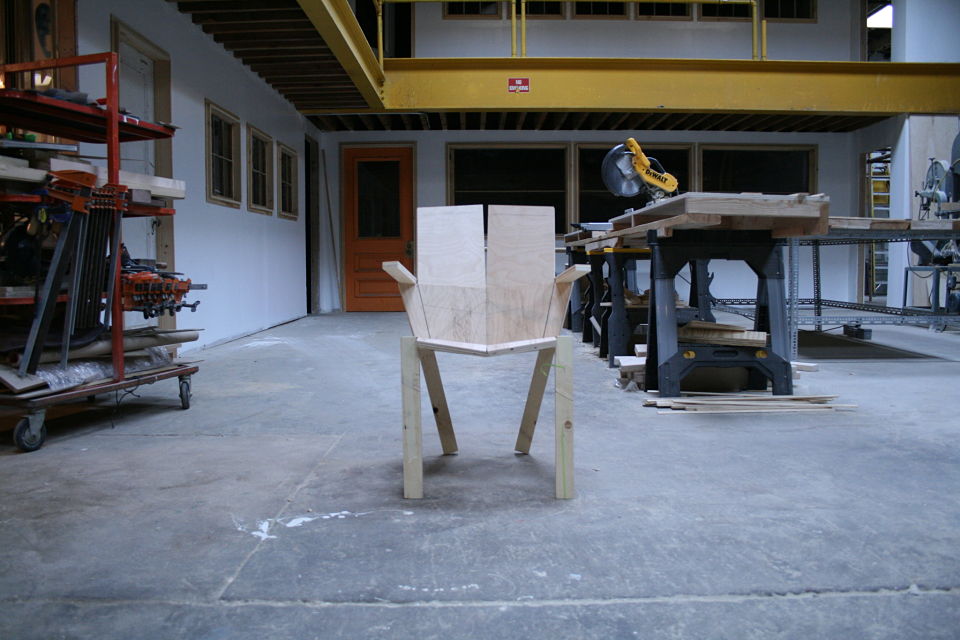
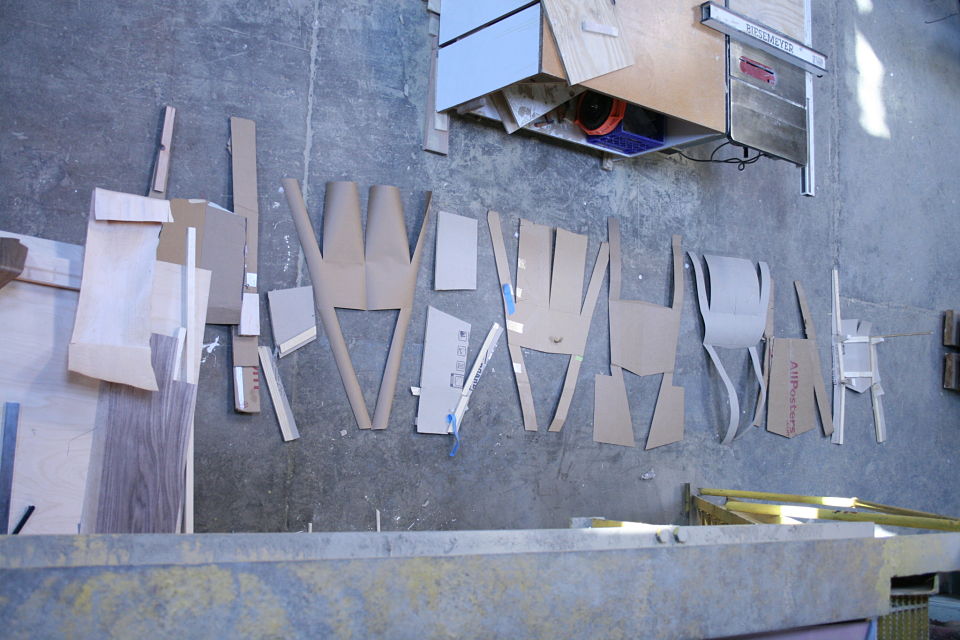
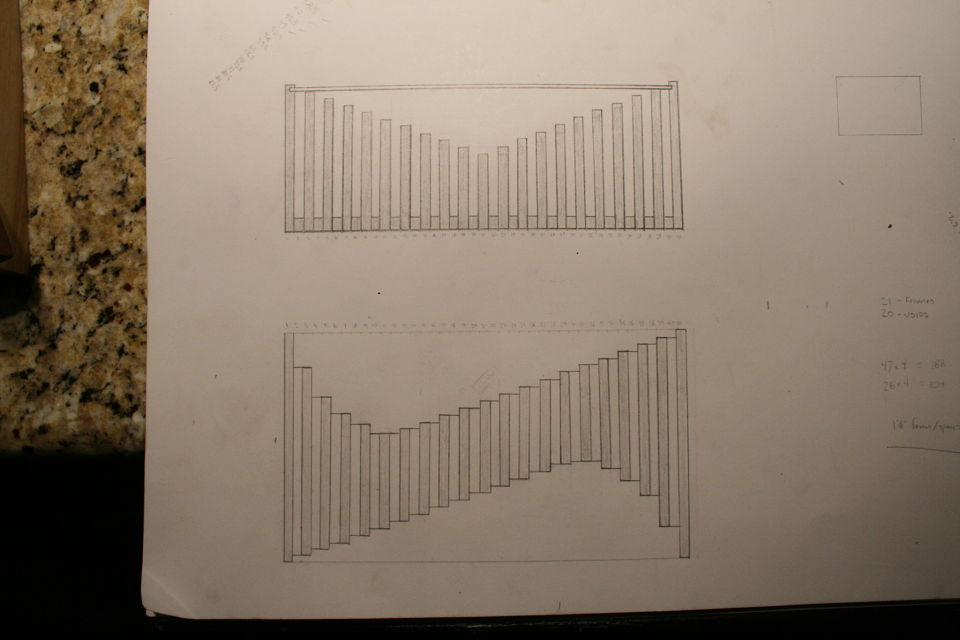
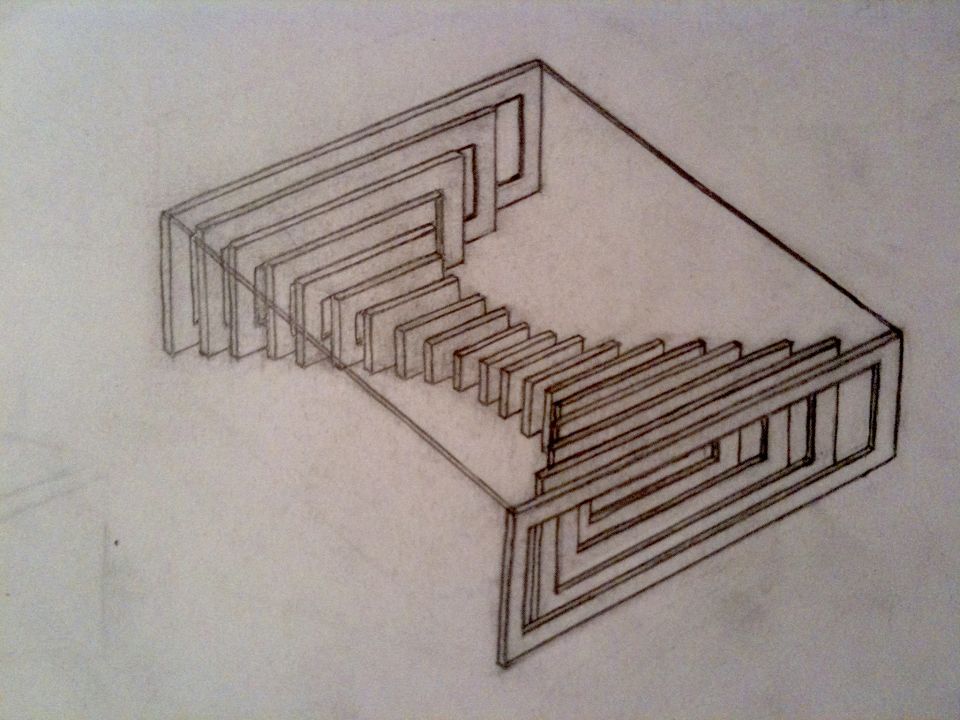
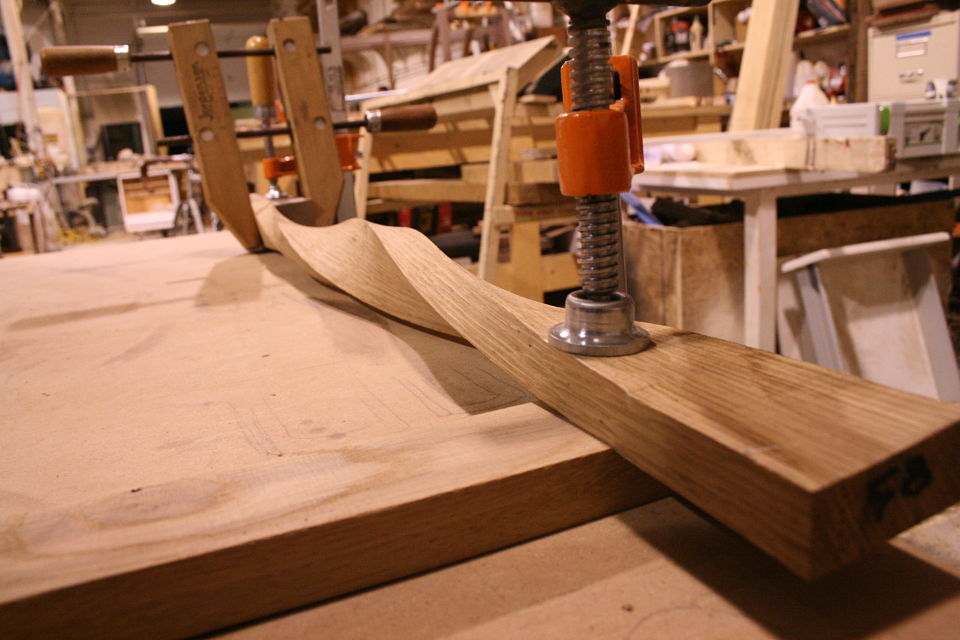
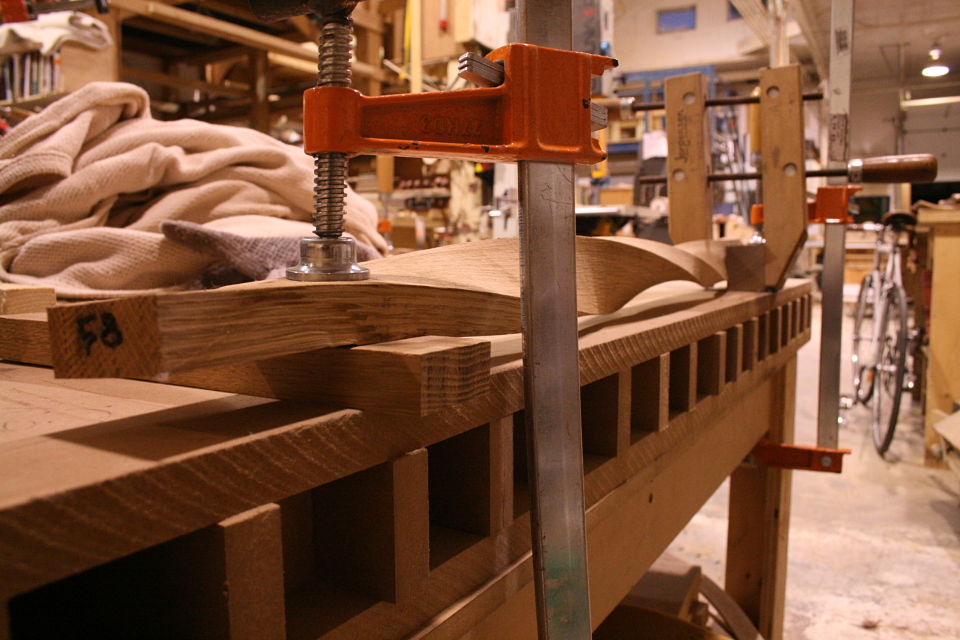
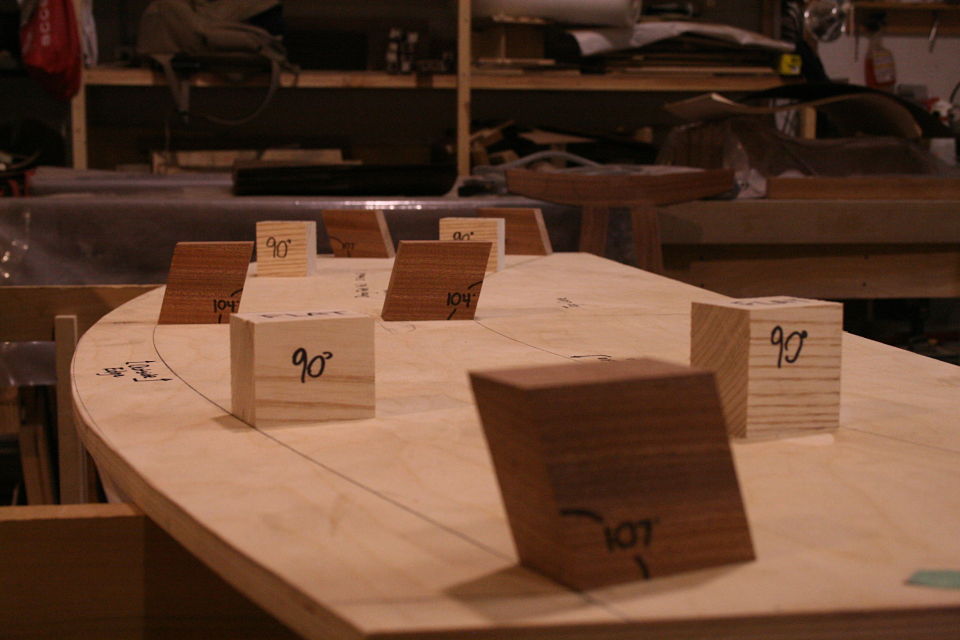
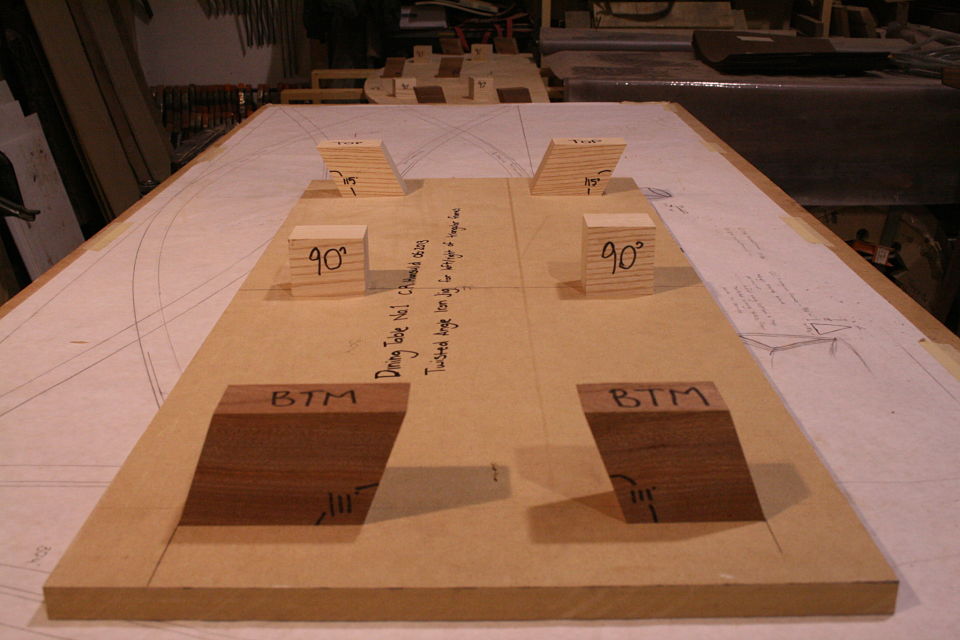
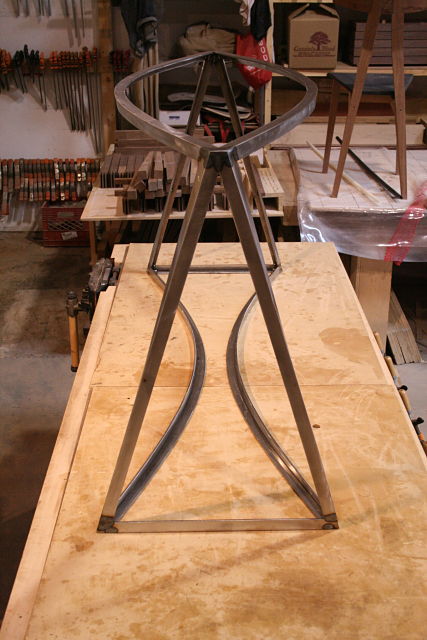
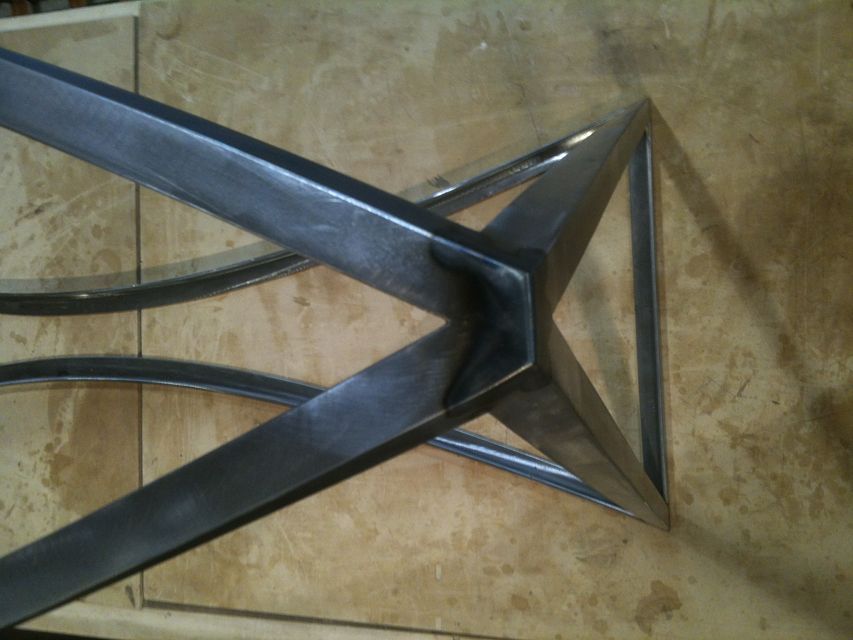
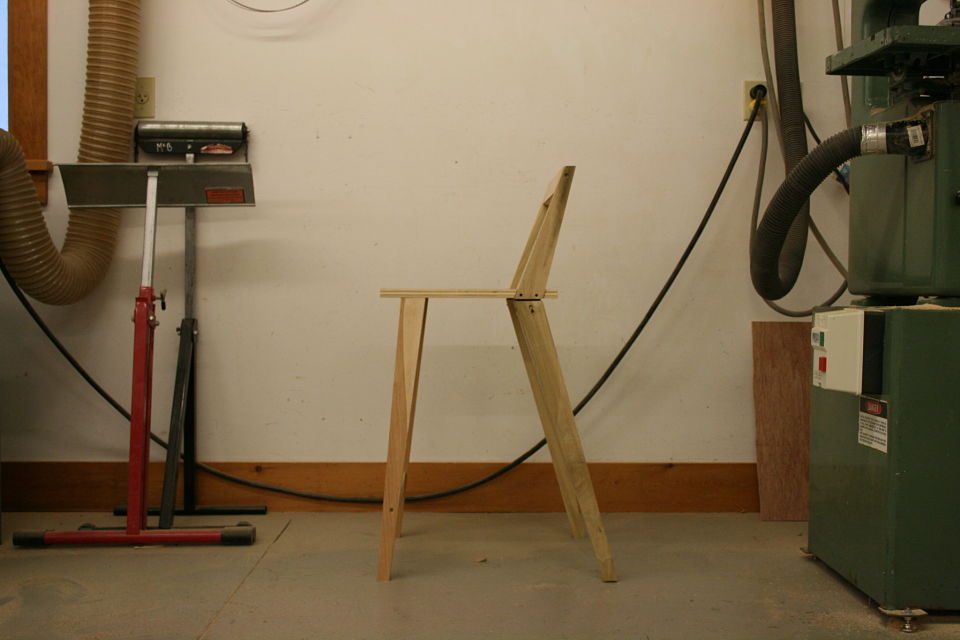
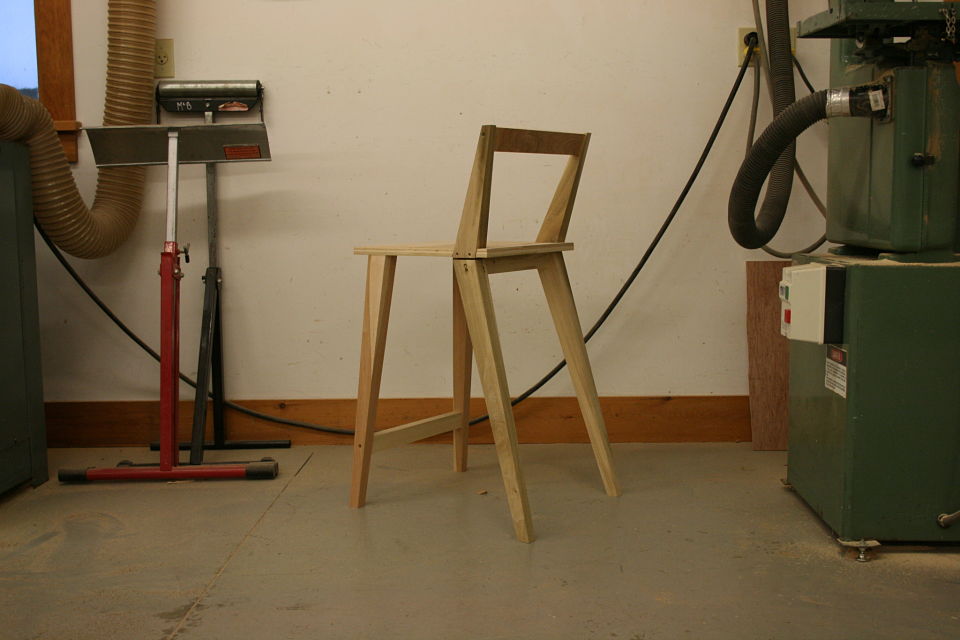
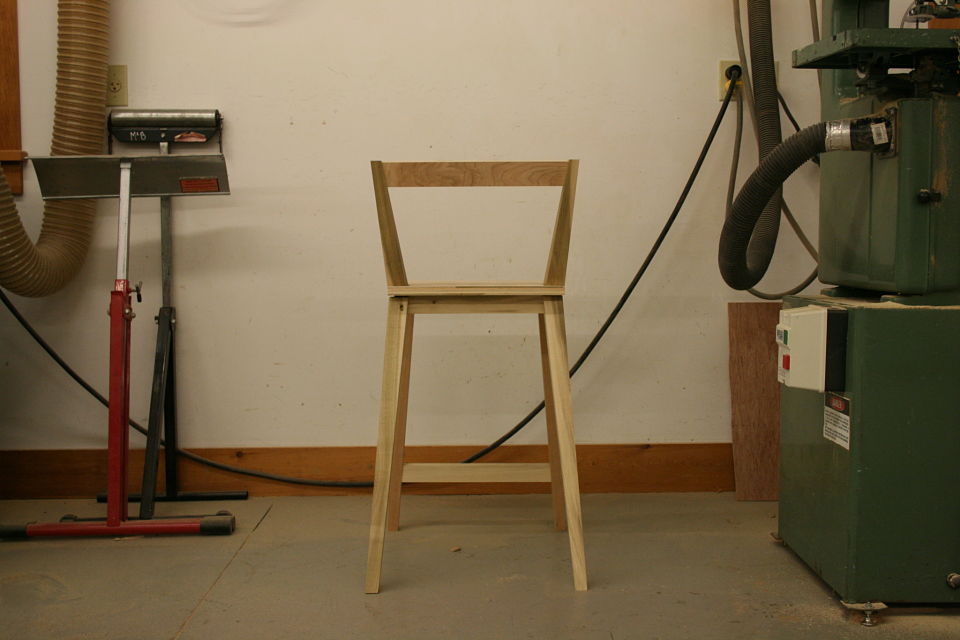
Pictured below are a few (of what seems like hundreds at this point) of my mockups. They are cut from paper, cardboard, and one version made out of plywood to get something rigid enough to take angles from and sit in to work through ergonomics.

I know it doesn’t seem like much yet, but stay tuned, this will be a learning intensive journey for everyone involved.

IMG_6636

IMG_6666_opt IMG_6676_opt IMG_6696_opt

0

Rocking Chair Debuts at the Interior Design Show

Azure-Emerging-Reed-Hansuld-2I know it has been a long time between posts, the business and life side of all this took priority for a little while. Through January and February I was preparing for and exhibiting at the Toronto Interior Design show as well as relocating to Brooklyn, New York.

In this post is a picture from the show as well as the most recent piece produced, Rocking Chair No. 1.  It is walnut construction with a steel subframe, the steel gives the piece the structure it requires to take the load of a person. The cool (and somewhat unexpected) thing about it is the chair has no noticeable flex from the cantilevered seat or back, but has a slight flex side to side. It allows the back and seat to move independently from one another as the sitter adjusts in the chair.

I will go back in the coming weeks to post the process of creating this chair as well as posting about a new chair commission I am in the midst of currently designing.

Thanks for following, hope you enjoy.

DSC_6824-editSmaller DSC_6863-Edit_opt DSC_6912-edit_optDSC_6952editSmaller


0

Dining Table No.1 Finds Its Home

Dining Table No. 1 has arrived in its new home. I was enormously nervous while delivering this table, I was unsure of how stable the table would be but was very pleasantly surprised to find I could actually sit on the outer edge of the glass without the table so much as budging. Relief.

The current piece of glass is from the clients old dining table, they plan on purchasing a longer piece of glass that may have some shape to it. I will professional photograph it once the real top has arrived.

IMG_6050_opt IMG_6063_opt IMG_6045_opt IMG_6069_opt IMG_6067_opt

0

Drawing and Erasing, and Erasing

This week I have spent a bit of time sketching Coffee Table No. 1  for a new client who is looking to commission the same table, just bigger, and rectangular.  In order to work through the design in my own brain and determine pricing I needed to work out the piece in scale on paper. The top view and side view of the table are done to scale and are more for my benefit, the perspective drawing is to scale as best as my eye could accomplish and is more so there to give the client an idea of what the piece will look like.

Drawing is something that always takes me a long time. There is a lot of layout and erasing that happens, a LOT of erasing. It is something that I am constantly improving at, for the sake of reference I have the perspective drawing from the original coffee table design that I sold a different client this time last year. Gives you a bit of insight into how my drawing abilities have progressed in even just this last year.

As my aesthetic develops into designing pieces using lots of parts to achieve an overall greater form I wonder if my time might be better spent learning how to design on a computer. At the end of the day I just enjoy drawing by hand, probably for the same reasons I enjoy making furniture by hand. Not to mention I think there is something kind of special nowadays about showing up to a clients home with a sketchbook and a pencil to show them concepts rather then a laptop.

IMG_6402_opt IMG_6405_opt

IMG_1395_opt


0

66 Slats / 198 Fasteners

With the white oak slats twisted into shape and drying it was time to layout exactly where each slat was going to attach to the frame and drill holes in the steel frame for where the fasteners would go. It took a few tries to get the spacing right with the dividers, a centreline was scribed and the holes were set with a punch and hammer. The steel base was clamped down to the bed and using a jig that held the drill parallel to the bed 198 holes were drilled through the 3/16″ thick steel. 37.25″ of lineal steel were drilled through over the course of two days.

As the 66 wood slats got fit into place the same drill jig was used to drill out the wood slats for the fasteners.


IMG_5936_opt IMG_5939_opt

0

Twist and Shout!

A little while back we were twisting the 3/4″ thick by 2″ wide by 34″ long white oak slats to make up Dining Table No 1. We were doing this with kiln dried wood, which typically speaking doesn’t steam bend all that well, but given that the most extreme twists for the table are around 45 degrees we tested it out, and it seemed to work without any problems. After one long day and some 70 slats twisted and clamped to the metal base to dry we decided to “test the limits” with the few that remained in the steam box. The slats were steamed for roughly 2-3 hours at 200+ degrees fahrenheit, the results were pretty incredible, to watch the bending happen check out this video.

IMG_5866_opt IMG_5873_opt IMG_5874_opt


0

Magical Metal Work

After a bit of a delay we’re back on to the metal dining table with the twisted white oak slats. I know there have already been pictures of the twisted slats and a video of us “getting our twist on,”  but we’re going to take a step back on this post.

Below are pictures of the metal frame I had fabricated which will hold (frame) 66 twisted white oak slats. In order for the frame to properly hold the twisted wood slats it also requires the metal angle iron to twist from acute to obtuse back to acute, or vice-versa. This is also happening along a curve, two curves actually.

So, in order to ensure as much accuracy as possible (we’re kind of out in space after all) I not only provided a full scale drawing but also made jigs/forms for my metal worker to fabricate the curved twisting angle iron. You can see the angle blocks change from acute to obtuse along the curve, he used these to clamp a strip of cold rolled steel along, and then butt a curved section up to it tacking it along the way. The result was fabricating curved angle iron that changes from acute to obtuse back to acute, or vice-versa.

IMG_5381_opt IMG_5384_opt

There is also a twisted straight section where the angle iron changes from acute to obtuse down the length, no curves, these pieces will make up the triangular ends.

IMG_5395_opt

A lot of head scratching went on with this one, at this point I still had no idea just how the wood slats were going to get fit and attached to the frame. There was also the dilemma of not actually knowing if the piece would be sturdy enough to hold a large piece of glass, but its working in the world of unknown that keeps this exciting.

IMG_5569_opt IMG_1969_opt


0

Drawing and Reality

So with the mock-up complete for Bar Stool No. 3 it was time to move on to a more detailed full scale drawing. Below is a drawing that the more I tried to simplify it the more complicated it appeared. The result was my brain getting pretty mushy and working on something else for the morning (see the post about dodecahedrons).

In the end I needed to trust the angles and dimensions I had laid out and went to cutting the compound mitred frames that will make up this stool. The picture at the bottom is with the angles cut and pieces of tape wrapped around the outside of the miter to see how everything fits together. I should have been able to visualize this from my drawing (maybe?) but was pleasantly surprised when I began piecing the parts together and revealed the “double mitre” joint that will be visible from the back of the stool.


0

Mocking Up Bar Stool No. 3

While co-teaching the chair making course at the Center for Furniture Craftsmanship I got an opportunity to design a speculative piece, something I rarely have the opportunity to do throughout the rest of the year while commissioned work is on the go.

Below are pictures of the first mockup for a new bar stool design. I usually begin my design process for seating objects by going from a sketch to a full size drawing. The full size drawing doesn’t need to be complete from all views, but at least have basic dimensions, shapes and angles roughed out. I then make the first mockup with whatever materials are lying around, in this case plywood, poplar, screws and hot glue to get a rough idea of proportions, shapes, heights and angles. The mockup is a tool used to go back and refine the drawing, see the idea in three-dimension and begin to work through what the construction / process of the piece might look like. It’s always best if you can sit in the mock up to gauge comfort of heights and angles, sometimes additional props or stilts might be required.

Things I learnt from this mockup….

I felt the weight of the legs was a bit heavy, so they have been taken down in dimension on the first iteration. Part of this might be the thickness of the plywood seat I had available which is a bit thinner (lighter) then I have planned. I also wasn’t a fan of the seat sticking out past the back legs, so that has been reworked. The footrest has been raised, and the front legs have a wider stance to give the seat some splay which will be more cohesive with some of the other tapered forms found throughout the piece. Now to sort out the construction…

IMG_6322_opt IMG_6324_opt IMG_6326_opt

1

Dining Table No. 1 Sketch

Incorporating metal into my furniture is something I have a growing interest in as of late. It opens new doors for pushing the boundaries of traditional construction and forms. Below is a sketch of a dining table commission, it will at some point be a metal frame that will house 66 twisted wood slats in the weeks to come. Stay tuned for updates of the process and headaches that will surely follow.

IMG_4695_opt

1

Powered by WordPress. Designed by Woo Themes